la creazione o lo sviluppo di un modulo Prestashop funziona sia per il front-end che il back-end del sistema
la struttura di un modulo è fissa che si compone con una serie di step:
- file di configurazione
- file di installazione
- files controllers per l'amministrazione
- files controllers per il frontend
- files delle view
creazione dell'infrastruttura base del modulo per Frontend
all'interno della cartella modules di prestashop creare una cartella
esempio
<root>
|---modules
|-----miomodulo
naturalmente il nome del modulo lo potete personalizzare
all'interno della cartella miomodulo creare i seguenti file
- config.xml
- index.php
- miomodulo.php <-- inserite il vostro nome modulo al posto di mio modulo
index.php
il codice di index php, file che dovrà essere inserito in ogni cartella:
<?php
/*
* 2007-2013 PrestaShop
*
* NOTICE OF LICENSE
*
* This source file is subject to the Academic Free License (AFL 3.0)
* that is bundled with this package in the file LICENSE.txt.
* It is also available through the world-wide-web at this URL:
* http://opensource.org/licenses/afl-3.0.php
* If you did not receive a copy of the license and are unable to
* obtain it through the world-wide-web, please send an email
* to license@prestashop.com so we can send you a copy immediately.
*
* DISCLAIMER
*
* Do not edit or add to this file if you wish to upgrade PrestaShop to newer
* versions in the future. If you wish to customize PrestaShop for your
* needs please refer to http://www.prestashop.com for more information.
*
* @author PrestaShop SA <contact@prestashop.com>
* @copyright 2007-2013 PrestaShop SA
* @license http://opensource.org/licenses/afl-3.0.php Academic Free License (AFL 3.0)
* International Registered Trademark & Property of PrestaShop SA
*/
header("Expires: Mon, 26 Jul 1997 05:00:00 GMT");
header("Last-Modified: ".gmdate("D, d M Y H:i:s")." GMT");
header("Cache-Control: no-store, no-cache, must-revalidate");
header("Cache-Control: post-check=0, pre-check=0", false);
header("Pragma: no-cache");
header("Location: ../");
exit;
config.xml
il file contiene delle semplici configurazioni per installare il modulo, anche se la vera installazione sarà eseguita con un'altro file
<?xml version="1.0" encoding="UTF-8" ?>
<module>
<name>miomodulo</name>
<displayName><![CDATA[Il mio modulo]]></displayName>
<version><![CDATA[1.0]]></version>
<description><![CDATA[Descrizione del mio modulo]]></description>
<author><![CDATA[Bwlab - www.bwlab.it - info@bwlab.it]]></author>
<tab><![CDATA[others]]></tab>
<confirmUninstall>Sicuro che vuoi disinstallare il modulo?</confirmUninstall>
<is_configurable>1</is_configurable>
<need_instance>1</need_instance>
<limited_countries></limited_countries>
</module>
il tag tab inserisce il modulo nella categoria che trovate nella lista dei moduli in back-end
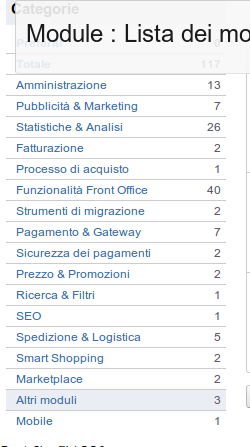
e le categorie sono
- admnistration
- advertising_marketing
- analytics_stats
- billing_invoicing
- checkout
- front_office_features
- migration_tools
- payments_gataweys
- payment_security
- pricing_promotion
- search_filter
- seo
- shiping_logistics
- smart_shoppig
- market_place
- others
- mobile
miomodulo.php
questo è il contenuto standard di un file di installazione modulo
<?php
if (!defined('_PS_VERSION_')) {
exit;
}
class MioModulo extends Module
{
/* @var boolean error */
protected $_errors = false;
public function __construct()
{
$this->name = 'miomodulo'; <-- inserite il nome del vostro modulo
$this->tab = 'others'; <-- la categoria del modulo
$this->version = '1.0';
$this->author = 'Bwlab - www.bwlab.it - info@bwlab.it';
$this->displayName = $this->l('Il mio modulo');
$this->description = $this->l('Descrizione del mio modulo.');
$this->confirmUninstall = $this->l('sicuro della disinstallazione?');
parent::__construct();
}
//questo metodo viene richiamato per 'installazione
public function install()
{
if (!parent::install()) {
return false;
}
$sql = array();
//in questo momento si imposta l'sql per la creazione di una o più tabelle
// notate il _DB_PREFIX_
$sql[] = 'CREATE TABLE IF NOT EXISTS `'._DB_PREFIX_.'miomodulo` (
`id` int(10) NOT NULL AUTO_INCREMENT,
`title` text,
PRIMARY KEY (`id`)
) ENGINE='._MYSQL_ENGINE_.' DEFAULT CHARSET=utf8;';
//creazione effettiva tabelle
foreach ($sql as $s)
if (!Db::getInstance()->Execute($s))
return false;
return true;
}
//questo è il metodo di disinstallazione del modulo
public function uninstall()
{
if (!parent::uninstall()) {
return false;
}
$sql = array();
$sql[] = 'DROP TABLE IF EXISTS `'._DB_PREFIX_.'bwlab_miomodulo`;';
foreach ($sql as $s)
if (!Db::getInstance()->Execute($s))
return false;
return true;
}
}
abbiamo settato il modulo e lo possiamo installare
basta andare sulla lista dei moduli nel back-end e lo vedremo elencato nella categoria assegnata
ma ora che ce ne facciamo?
alla prossima puntata
Commenti
Posta un commento